Vegetales en forma de Árbol de Navidad 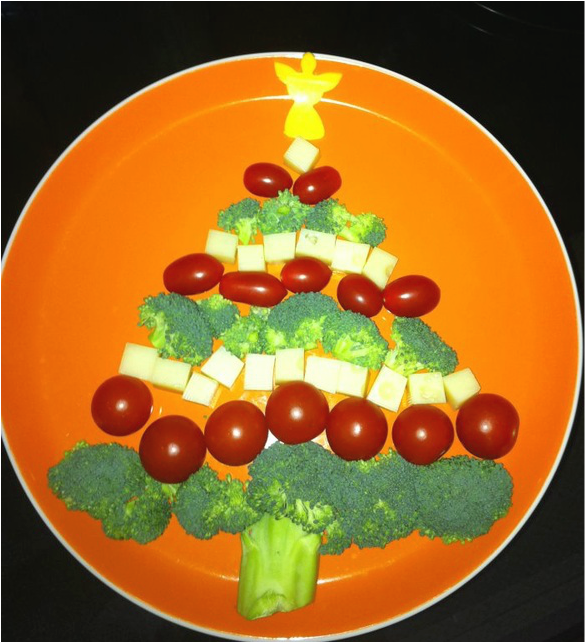
Having a Christmas party? Want to get creative? What about having veggies and cheese on the shape of a Christmas tree? For the top you can use a cookie cutter with the shape of and angel or star Vas a tener una fiesta de Navidad? Porque no ser creativa? Qué tal si sirves tus vegetales en la forma de un árbol de navidad? Puedes usar un molde de galletas para el parte de arriba del árbol, ya sea en forma de ángel o de estrella. 
4 Comments
En español después de la versión en Ingles 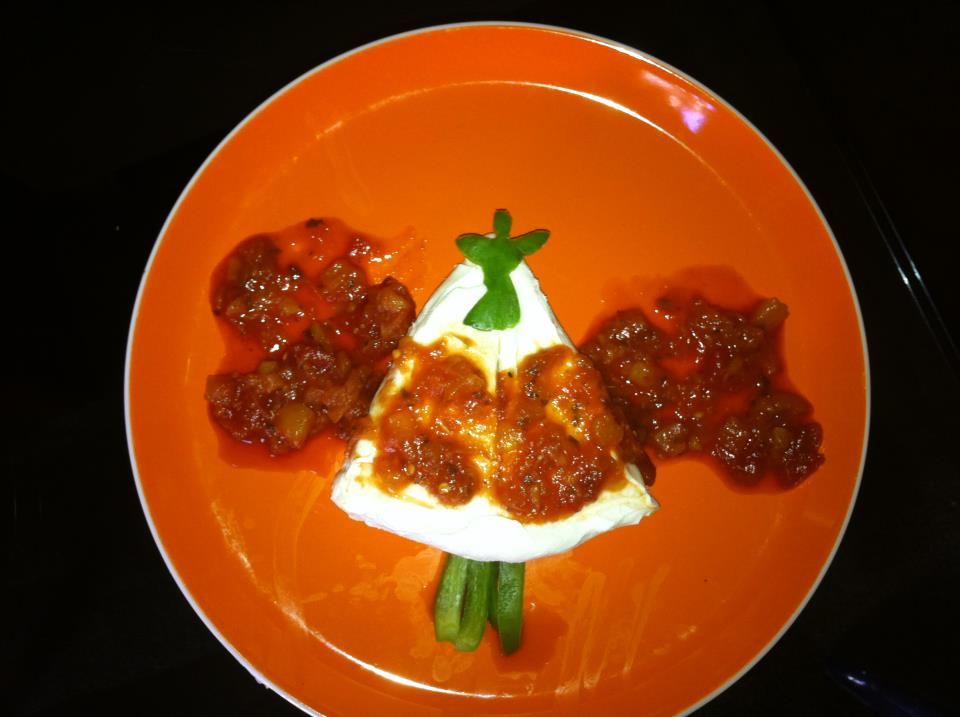
Ingredients: 1 package cream cheese 1 Green bell pepper ¼ cup of chunky salsa ¼ cup orange marmalade Directions: 1. Cut block of cream cheese diagonally in half. Then arrange it form a triangle. 2. Use an angel cookie cutter to cut the shape of the angel out of a bell pepper and place it on the top of the tree. 3. Cut bell pepper on straight line pieces and place at base of tree. 4. Mix salsa and marmalade and spoon over cream cheese Serve with tortilla chips. Árbol de Navidad hecho de queso crema Ingredientes 1 bloque de queso crema 1 Chile campana verde ¼ taza de salsa ¼ taza de mermelada de naranja Preparación 1. Corte el bloque de queso crema en la mitad en forma diagonal. Luego arréglelo en forma de triangulo 2. Use un molde de galletas en forma de ángel para cortar la forma de ángel de el chile campana y colóquelo en la parte de arriba del triangulo (árbol) 3. Corte el chile campana en tiras y colóquelos en la base del triangulo (árbol) 4. Mezcle la salsa y la mermelada y colóquelos encima del queso crema 5. Sirva con chips 
En español después de la versión en Ingles  It is getting cold outside. There is nothing better that stay under the blankets and enjoy quiet time with the family. But it is also the time to entertain and have little parties with family and friends. I do not know about you, but I usually stress out about the preparation for the food for our parties. Just thinking what to make and getting together all the ingredients is exhausting. So, when I heard that the National Honey Board had developed a program called Honey + 4 I was very interested. Honey + 4? Honey + 4 ingredients! Really, that's IT. The National Honey Board and food expert Ericka Sanchez have created a tasty and clever menu that will impress your guests and take your party from casual reunion to holiday soirée. Savory, sweet and ever-so presentable, these flavorful nibbles are as easy on the eyes as they are on the palate! 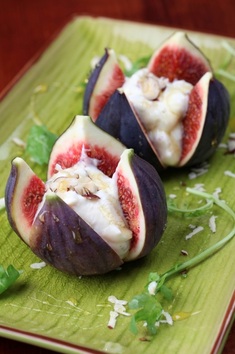 Cheese-Stuffed Figs with Peppery Honey Port Syrup Ingredients: 2 tbsps honey 8 fresh figs 8 tsps cream cheese, room temperature 1/3 cup ruby port 5 black peppercorns Preparation: In a small saucepan, heat port, honey and peppercorns over low to medium flame. Bring to a boil and continue cooking until the consistency becomes syrupy; this should take approximately 2 minutes. Set aside and let cool. Remove peppercorns. Cut the stem off of each fig. Then cutting the fig crosswise, gently open them like a flower. Place a teaspoon of cream cheese in the center of each “flowered” fig and drizzle with honey port syrup.  Mini Buñuelos with Honey Cream Ingredients: 1 cup honey 8, 8-inch flour tortillas Oil for frying (canola or vegetable oil) 1 cup crème fraiche 1 tsp cinnamon Preparation: Cut out each tortilla with 4"-inch round cookie cutters. Fold each side of the cut out piece over on opposite sides so as to allow both folds to meet in the center, forming a pocket. Heat 1-inch of cooking oil in large skillet. Once hot, fry each tortilla pocket until golden brown. Place on paper towels to drain excess oil. Let cool. Next, place ½ cup honey in a small bowl. Once tortillas are cool, carefully brush each one with honey. In a small saucepan over low heat, warm the remaining ½ cup of honey until easily stirred. Add crème fraiche and cinnamon. Continue stirring until all ingredients have thoroughly combined. Serve buñuelos drizzled with the honey cream or on the side for dipping. For more yummy recipes, click on the pictures below     Bocadillos con Miel Fáciles y Deliciosos para fiestas Hace frio, y no hay nada mejor que estar bajo las cobijas y disfrutar un tiempo relajado con la familia. Pero también es tiempo de reunirse con los amigos y familiares y tener pequeñas fiestas. Yo no sé ustedes, pero a mí me estresa mucho pensar en la preparación de la comida para las fiestas. Tener que pensar en todos los ingredientes e ir de compras me deja cansada. Por eso cuando escuche de el programa de el National Honey Board llamado Miel + 4, me intereso mucho. ¿Miel + 4? ¡Miel+ 4 ingredientes! Así es, sólo ESO. National Honey Board y la experta en cocina Ericka Sánchez han creado un menú creativo y delicioso que impresionará a tus invitados y transformará esa reunión informal en una gran velada. Salados, dulces y con una presentación impecable, ¡estos bocadillos llenos de sabor son un deleite para los ojos y el paladar!  Higos Rellenos de Queso Crema con Almíbar de Miel y Oporto a la Pimienta Ingredientes: 2 cucharadas de miel 8 higos frescos 8 cucharaditas de queso crema, a temperatura ambiente 1/3 taza de oporto tipo ruby (ruby port) 5 granos de pimienta negra Preparación: Calienta el oporto, la miel y los granos de pimienta en una sartén pequeña a fuego bajo-mediano. Cuando hierva, deja cocinar hasta que la preparación tome la consistencia de almíbar; aproximadamente 2 minutos. Quita del fuego y deja que se enfríe. Retira los granos de pimienta. Corta el cabito de cada uno de los higos. Después, haz un corte en cruz y ábrelos cuidadosamente en forma de flor. Coloca 1 cucharadita de queso crema en el centro de cada “higo en forma de flor” y rocía con el almíbar de miel y oporto.  Ingredientes: 1 taza de miel 8 tortillas de harina, de 8 pulgadas Aceite de canola o vegetal para freír 1 taza de crème fraiche 1 cucharadita de canela Preparación: Corta cada tortilla con un cortador de galletas redondo de 4 pulgadas. Dobla cada costado de la tortilla sobre el lado opuesto uniendo ambas partes en el centro, formando una “bolsita”. Calienta 1 pulgada del aceite en una sartén grande. Cuando esté caliente, fríe cada “bolsita” hasta que tome un tono dorado. Colócalas sobre toallas de papel para escurrir el aceite excedente. Deja enfriar. Luego, coloca ½ taza de miel en un recipiente pequeño. Una vez que estén frías las “bolsitas,” pincela cada una delicadamente con miel. En una sartén pequeña, calienta la ½ taza restante de miel a fuego bajo, hasta que puedas revolverla con facilidad. Agrega la crème fraiche y la canela. Sigue revolviendo hasta integrar perfectamente todos los ingredientes. Sirve los buñuelos con un poco de crema a la miel arriba o colócala a un costado para que sea un dip. Para mas recetas deliciosas, haz click en las fotos de abajo     
Ingredients 1 box of vanilla cake 1 container caramel (dulce de leche) 1/2 cup of crushed pretzels 1/2 cup crushed toffee 1 package caramel candy 2 tablespoons heavy cream 1 bag of chocolate chips Sea Salt Lollipop sticks Preparation Prepare the cake following the instructions on the box. Once it is cool crumble the cake into a large plastic bowl, making sure that it is on small pieces. Mix the caramel, pretzel pieces and toffee pieces with the cake crumbs. Mix until well combined. Roll the cake mixture into 1 inch balls. Place these balls in a cookie sheet covered in wax paper and put it on the refrigerator for a couple of hours. Melt the chocolate chips following the instructions on the bag. Dip the end of each lollipop stick into the chocolate chips melted and then insert the chocolate end into the cake balls. Dip the balls into the chocolate. Place back on the wax paper. Put back in the refrigerator until the chocolate is hard. Using a double boiler, melt the caramel candy chews. Add the heavy cream to make the caramel smooth. Dip the chocolate covered cake balls into the caramel half way. Sprinkle with sea salt. 

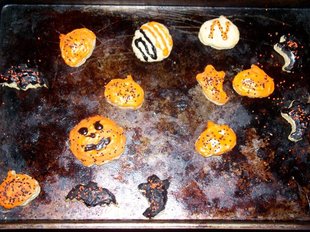
A mí me encanta compartir tiempo con mi hijo. Siempre estoy buscando actividades que nos permitan pasar entretenidos, pero al mismo tiempo que le enseñen algo. Por eso cuando mi hijo me pregunto si podíamos decorar y prepararnos para Halloween, pensé que era la oportunidad perfecta para hornear galletas. Por supuesto que también hicimos disfraces de robots, y otras actividades, pero estar juntos en la cocina, escogiendo las formas para las galletas, decorándolas y también comiéndolas, fue una experiencia maravillosa. 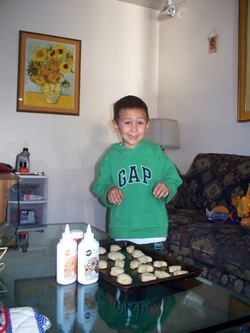 Receta para las galletas de mantequilla 2 ½ tazas de harina 1 taza de mantequilla 1 ½ tazas de azúcar 1 huevo, ligeramente batido 1 cucharadita de extracto de vainilla Batir la mantequilla con el azúcar hasta formar una masa suave. Agregar el huevo y el extracto de vainilla y continuar batiendo. Agregar esta mezcla a la harina. Crear una masa suave. Refrigerar la masa por media hora. Aplanar la masa con el rodillo y cortar las galletas en la forma deseada. Hornear por 12-15 minutos a 350 grados. Al retirar del horno dejar enfriar por un minuto y luego decorarlas al gusto. 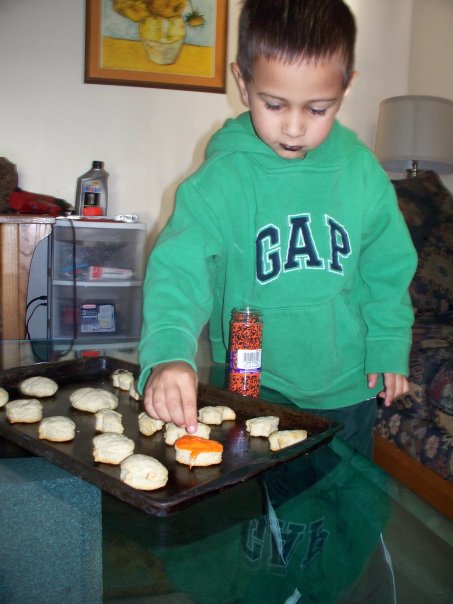 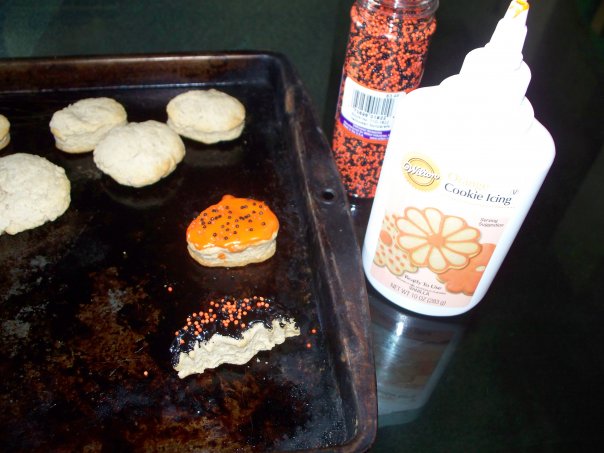  
|


Categories
All
Archives
May 2023
 |
 RSS Feed